
Learning Objectives
5 objectivesBy the end of this note, you should be able to:
- Make temporary preparations of cellular material for light microscopy.
- Draw cells from microscope slides and photomicrographs accurately.
- Calculate magnifications and actual sizes from images and micrographs.
- Use an eyepiece graticule and stage micrometer with appropriate units.
- Define resolution and magnification and distinguish them in light and electron microscopy.
Preparing Temporary Slides for Microscopy
A temporary slide is a quick mount of fresh tissue that allows a student to view living or freshly stained cells under a light microscope. The technique is simple but examiners test whether each step is understood, especially the role of staining and the prevention of air bubbles.
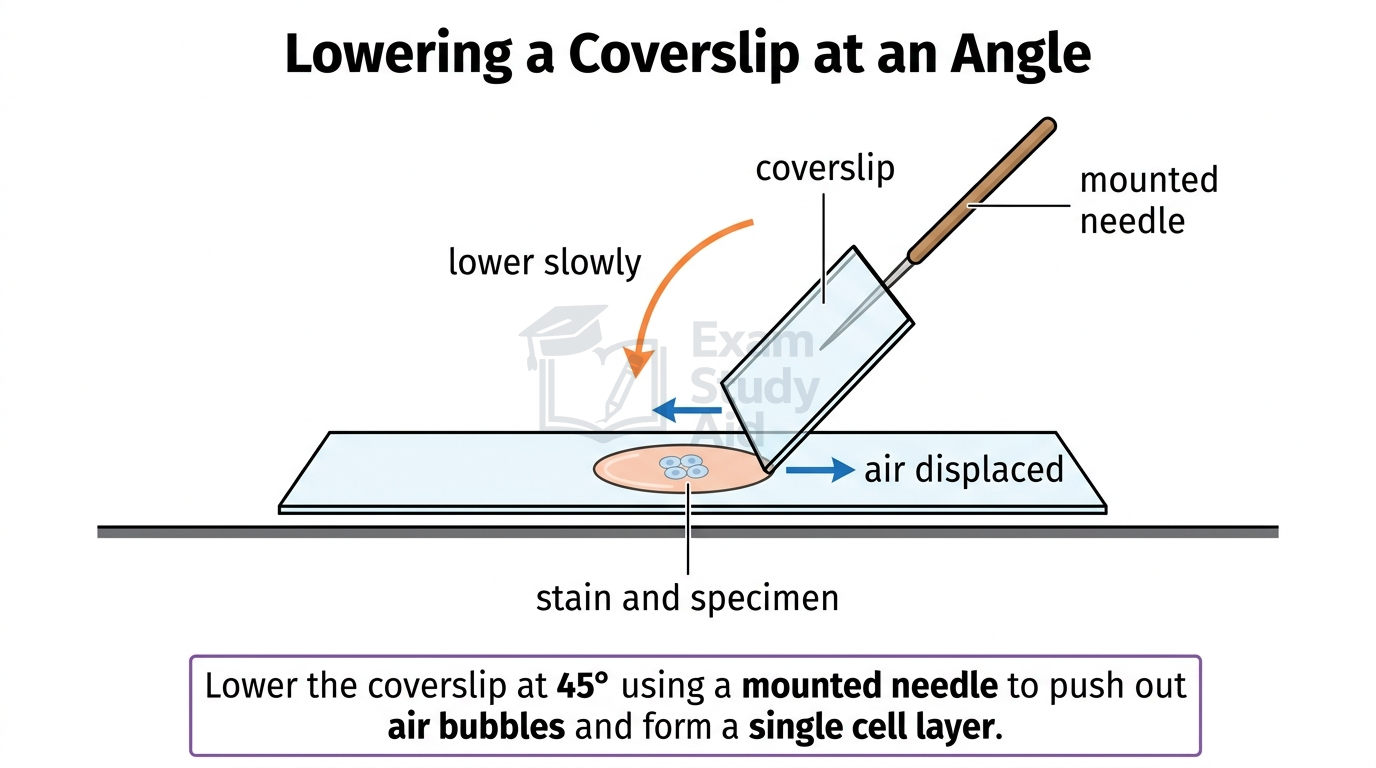
The specimen must be very thin so that light can pass through it. A stain is then added to create contrast between cell components that would otherwise look transparent. Common stains include iodine in potassium iodide solution, which colours starch grains blue-black, and methylene blue, which stains nuclei dark blue. The coverslip is lowered at an angle using a mounted needle so that air bubbles do not form between the slide and the coverslip.
Practical Note: Preparing a Temporary Slide of Onion Epidermis
Peel a thin layer of epidermis from a piece of onion using forceps and place it flat on a clean slide. Add one drop of iodine solution to stain the cells, then lower a coverslip slowly at an angle using a mounted needle. Blot any excess stain at the edge of the coverslip with filter paper.
The specimen must be only one cell thick and free of air bubbles, because thick layers and bubbles both prevent clear focusing under high power.
Drawing Cells from Slides and Micrographs
Biological drawings are assessed for accuracy, proportion and clarity, not artistic skill. The examiner expects clean single lines, no shading, and labels that touch the structures shown. Students should draw only what is actually visible in the field of view or photomicrograph.
There are two types of drawing required at AS level. A plan diagram shows the distribution of tissues only, with no individual cells drawn, and is used for low-power views of organs such as stems or leaves. A cell drawing shows individual cells under high power, with cell walls drawn as two parallel lines, and only the contents that can actually be seen.
A drawing should fill at least half of the available space. Lines must be continuous and drawn with a sharp HB pencil. Label lines must be ruled, must touch the structure being labelled, and must not cross one another.
Drawing Guidance: Drawing Cells from a Photomicrograph
Use a sharp pencil and draw clean, continuous lines with no sketchy or hairy edges. Draw cell walls as two parallel lines, and three lines where two cells share a wall. Maintain the correct relative size and shape of cells as seen in the image. Do not add any structure that is not actually visible, and do not shade or colour. Use ruled label lines that touch each structure.
Calculating Magnification and Actual Size
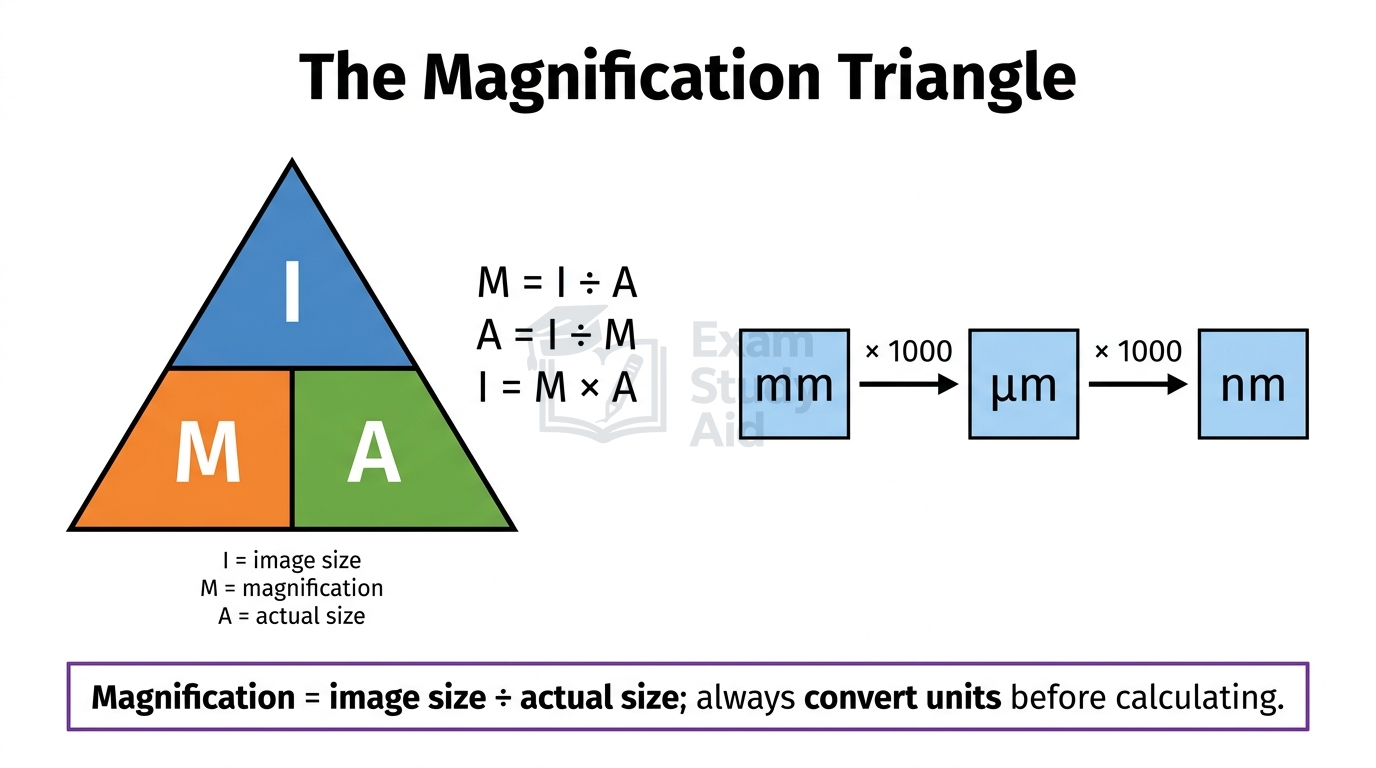
Magnification is calculated using the relationship between image size, actual size and magnification, and is one of the most frequently tested numerical skills at AS level. The standard formula is:
Magnification = Image size ÷ Actual size
This relationship can be rearranged to find any of the three quantities. To find the actual size, divide the image size by the magnification. To find the image size, multiply the actual size by the magnification.
The most common error is mixing units. The image size and actual size must be in the same unit before dividing, otherwise the answer will be wrong by a factor of 1000 or more. Useful conversions are 1 mm = 1000 µm, and 1 µm = 1000 nm. Magnification itself has no units because it is a ratio.
For example, if a cell measures 40 mm on a photomicrograph and the actual cell is 20 µm long, first convert 40 mm into 40 000 µm. The magnification is then 40 000 ÷ 20 = ×2000.
MisconceptionStudents often forget to convert units before dividing, giving answers that are 1000 times too large or too small. Always check that image size and actual size are expressed in the same unit before applying the formula. Exam cue: Convert both measurements to micrometres before calculating.
Using an Eyepiece Graticule and Stage Micrometer
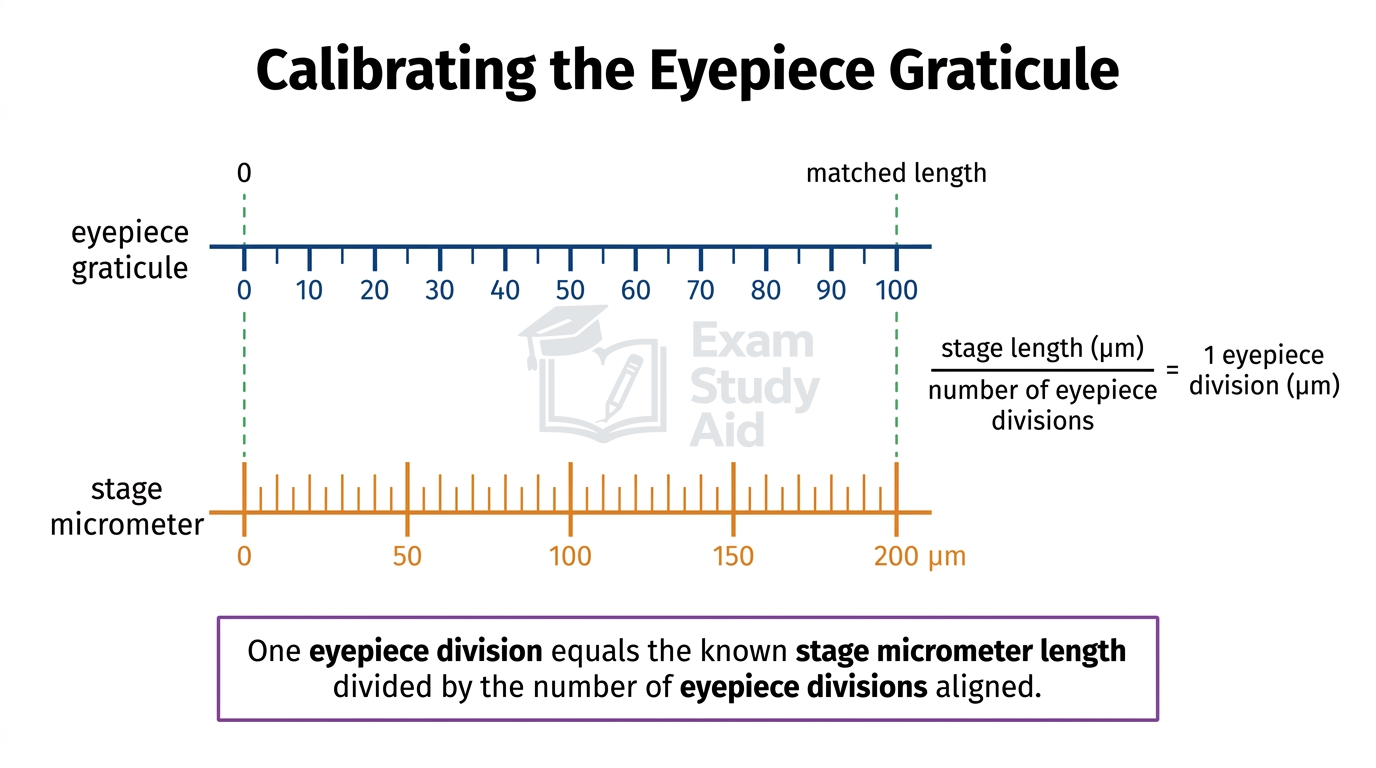
Direct measurement of cells under the microscope requires two scales used together. An eyepiece graticule is a small ruler etched onto a glass disc inside the eyepiece, and its divisions stay the same size in the field of view. A stage micrometer is a special slide with a finely engraved scale of known length, usually 1 mm divided into 100 divisions of 10 µm each.
The eyepiece graticule must be calibrated because each eyepiece division represents a different real length at each objective lens. Calibration is done by placing the stage micrometer on the stage and aligning its scale with the eyepiece scale. The student then counts how many eyepiece divisions match a known number of micrometer divisions. Dividing gives the real length of one eyepiece division at that magnification.
For example, if 50 eyepiece divisions line up with 40 stage micrometer divisions of 10 µm each, then 50 eyepiece divisions equal 400 µm. One eyepiece division therefore equals 8 µm at that objective. Recalibration is needed every time the objective lens is changed, because magnification alters how much of the specimen fits inside one eyepiece division.
Measurements should always be reported in the appropriate unit. Use millimetres for organs and tissues, micrometres for cells and organelles visible by light microscopy, and nanometres for ultrastructure visible only by electron microscopy.
Resolution and Magnification Compared
Magnification is the number of times larger the image of a specimen is compared with the actual specimen. Resolution is the smallest distance between two points that can still be seen as separate points. The two terms describe completely different properties and must never be confused.
Magnification can be increased simply by using a stronger lens, but resolution is limited by the wavelength of the radiation used to view the specimen. Once the limit of resolution is reached, increasing the magnification only produces a larger but blurred image. This is sometimes called empty magnification, because no new detail appears.
A light microscope uses visible light, which has a wavelength of around 400–700 nm. This limits its resolution to about 200 nm and its useful magnification to roughly ×1500. An electron microscope uses electron beams, which have a much shorter wavelength than light. This gives a far higher resolution and allows much greater useful magnifications.
| Feature | Light microscope | Transmission EM | Scanning EM |
|---|---|---|---|
| Radiation used | Visible light | Electron beam through specimen | Electron beam reflected from surface |
| Maximum resolution | ~200 nm | ~0.2 nm | ~3–10 nm |
| Maximum useful magnification | ~×1500 | ~×500 000 or more | ~×100 000–500 000 |
| Specimen | Living or dead | Dead, in vacuum, very thin | Dead, in vacuum, surface coated |
| Image | Coloured, 2D | Black and white, 2D, internal detail | Black and white, 3D surface |
Examiner InsightStudents often write that electron microscopes “have higher magnification” when the mark is for higher resolution. Mark schemes credit answers that link the shorter wavelength of electrons to the ability to distinguish smaller structures as separate points. Exam cue: Always link higher resolution to shorter wavelength of electrons.
QUICK RECAP
Key Points
- Temporary slides need thin specimens, stain, and a coverslip lowered at an angle.
- Iodine stains starch; methylene blue stains nuclei.
- Plan diagrams show tissues only; cell drawings show individual cells.
- Drawings need clean lines, ruled labels, no shading.
- Magnification = image size ÷ actual size.
- Always convert image and actual size to the same unit.
- 1 mm = 1000 µm; 1 µm = 1000 nm.
- Eyepiece graticule has arbitrary divisions of fixed apparent size.
- Stage micrometer carries a scale of known real length.
- Calibration converts eyepiece divisions into micrometres.
- Recalibrate every time the objective lens is changed.
- Magnification = how many times larger the image is.
- Resolution = smallest distance between two distinguishable points.
- Resolution is limited by wavelength of radiation used.
- Light microscope resolution ≈ 200 nm; useful magnification ≈ ×1500.
- TEM resolution ≈ 0.2 nm; gives internal ultrastructure.
- SEM resolution ≈ 3–10 nm; gives 3D surface images.
- Electron microscopes need dead specimens in a vacuum.
CAN I…? PROGRESS CHECK
Self-Assessment
- Prepare a temporary slide of plant or animal tissue with appropriate stain.
- Lower a coverslip correctly to avoid air bubbles.
- Draw cells from a slide or photomicrograph using accepted conventions.
- Distinguish between a plan diagram and a cell drawing.
- Calculate magnification given image size and actual size.
- Calculate actual size given image size and magnification.
- Convert correctly between mm, µm and nm.
- Calibrate an eyepiece graticule using a stage micrometer.
- Explain why recalibration is required at each new magnification.
- Define resolution and magnification accurately.
- Explain why electron microscopes have higher resolution than light microscopes.
- Compare light, transmission and scanning electron microscopes by image, specimen and resolution.